Versions Compared

Key

  • This line was added.
  • This line was removed.
  • Formatting was changed.
Comment: Made minor grammatical changes

The Pixel Colocalization recipe is an image enhancement function that detects fluorescent labels from two input channels of the same image that are spatially overlapped (or "colocalized"). The recipe extracts pixels above the user-defined threshold while suppressing the rest. The result output can be used for additional processing using other Aivia detection recipes.

By default, the recipe generates two output channels: Colocalized Pixels Ch1 and Colocalized Pixels Ch2 containing the pixels that are above the specified intensity threshold from the respective input channels. User The user has the option of adding a third output channel, Combined Coloc Channel, that includes only pixels that are spatially overlapped between the two inputs, with the pixel intensity the average of the two input channels.


Panel

On this page:

Table of Contents
maxLevel3
exclude[4]


Inputs and Outputs

The Pixel Colocalization recipe takes in three input channels and can generate up to three output channels. The An output channels channel can be turned off by de-selecting the checkbox next to its name in the Input and Output section.

Inputs

There are three inputs to the recipe, and their descriptions are summarized in the table below.

Input ChannelDescription
Input Mask Channel

This input defines the image region that the colocalization analysis will be applied to. The Mask channel serves as an initial region-based filter for colocalization (for example: to demarcate cells from extracellular regions when analyzing spatial overlap between intracellular proteins). Colocalized signal that falls outside of the Mask channel region will not be included in the recipe output.

Typically, this input is the same as one of the two input colocalization channels.

Input Coloc Channel 1This input specifies the first of the two input image channels used for analyzing pixel colocalization.
Input Coloc Channel 2This input specifies the second of the two input image channels used for analyzing pixel colocalization.

Example An example of how each input channel is used is shown on the image on the right.


Image Modified

Input examples for Pixel Colocalization. The Input Mask Channel can be used for identifying the area the colocalization is applied, e.g. the whole cell (green). Input Coloc Channels 1 and 2 are used for colocalization, e.g. identifying spatial overlap between mitochondria (red) and the endoplasmic reticulum (blue). Red and blue pixels that are colocalized outside of the cell boundaries will be discarded. Image Courtesy: Broad Bioimage Benchmark Collection.


Outputs

There are three possible outputs from the recipe which can be specified in the Input /and Output section of the recipe. The description Descriptions of the outputs are summarized in the table below.

Output ChannelDescription
Colocalized Pixels Ch1

This output contains all image regions from Input Coloc Channel 1 that is are above the user-defined threshold; pixels that are below the threshold or outside of the defined Mask Channel area are suppressed.

This output is turned on by default.

Colocalized Pixels Ch2

This output contains all image regions from Input Coloc Channel 2 that is are above the user-defined threshold; pixels that are below the threshold or outside of the defined Mask Channel area are suppressed.

This output is turned on by default.

Combined Coloc PixelsThis output contains all image regions whose pixel intensities are above the user-defined threshold for both Input Coloc Channels 1 and 2 (or colocalized). The pixel intensity of this output is the average intensity of both Input Coloc Channels.


Parameters and Presets

Parameters

Recipe parameters for Pixel Colocalization and their descriptions are summarized in the table below.


Preset GroupParameter NameMin ValueMax ValueDescription
Mask DetectionMin Intensity Threshold0

255 (8-bit)

65,535 (16-bit)

Specifies the minimum intensity for image region detection; the image region defines the area that the colocalization analysis will take place. A ; a lower value will incorporate a larger area of the image for colocalization analysis
Fill Holes Size050,000Adjusts the maximum size threshold for filling in gaps inside the detected image region; a lower value will preserve more holes in the detection
Smoothing Factor1100Adjusts the amount of smoothing applied to the surface reconstructions of the detected image region; a lower value will preserve more of the region's morphological features
Channel 1 DetectionMin Intensity Threshold0

255 (8-bit)

65,535 (16-bit)

Specifies the minimum signal intensity for the first of the two input image channels used for colocalization analysis; a lower value will detect more, dimmer signals

Min Colocalized Pixels050,000Specifies the minimum area of contiguous pixels to be included in the analysis output
Channel 2 DetectionMin Intensity Threshold0

255 (8-bit)

65,535 (16-bit)

Specifies the minimum signal intensity for the second of the two input image channels used for colocalization analysis; a lower value will detect more, dimmer signals
Min Colocalized Pixels050,000Specifies the minimum area of contiguous pixels to be included in the analysis output


Presets

There are three preset groups in the recipe: Mask Detection, Channel 1 Detection and Channel 2 Detection; each group has three pre-configured parameter grouping groupings to help you get started on the analysis. The default preset values are as follows:


Mask Detection

Parameter NameLowMediumHigh
Intensity Threshold64 (8-bit)20 (8-bit)5 (8-bit)
16,384 (16-bit)5,243 (16-bit)1,311 (16-bit)
Fill Holes Size101010
Smoothing Factor122


Channel 1 Detection

Parameter NameSmallMediumLarge
Min Intensity Threshold64 (8-bit)20 (8-bit)5 (8-bit)
16,384 (16-bit)5,243 (16-bit)1,311 (16-bit)
Min Colocalized Pixels1510


Channel 2 Detection

Parameter NameSmallMediumLarge
Min Intensity Threshold64 (8-bit)20 (8-bit)5 (8-bit)
16,384 (16-bit)5,243 (16-bit)1,311 (16-bit)
Min Colocalized Pixels1510


Tutorial

Before beginning the tutorial, please download the Pixel Colocalization Demo Image. For information on how to select presets or modify parameter values, please refer to the tutorial on how to use the Recipe Console.

  1. Unzip the demo file and load the demo image, PixelColocDemo.aivia.tif, into Aivia
  2. Click on the Image Enhancement Tools tab on the side panel to the right of the image. Click on the Recipe selection dropdown menu and select the Pixel Colocalization recipe
  3. Click on the caret Image Modified titled Input and Output to select the input and output channels. Use the following channel settings:
    • Input Mask Channel: Ch3-T3
    • Input Coloc Channel 1: Ch2-T2
    • Input Coloc Channel 2: Ch3-T3
  4. Select the Medium preset for the Mask Detection preset group; and the Low presets for both the Channel 1 Detection and Channel 2 Detection preset groups
  5. Click on the Show Advanced Interface icon Image Modified to expand the recipe settings
  6. Change the parameters listed below to the specified values, leaving the others in tactintact:
    • Mask Detection
      • Min Intensity Threshold: 800
      • Smoothing Factor: 6
    • Channel 2 Detection
      • Min Intensity Threshold: 1500
  7. Click the Apply to All Frames button on your keyboard to begin applying the recipe to the image.

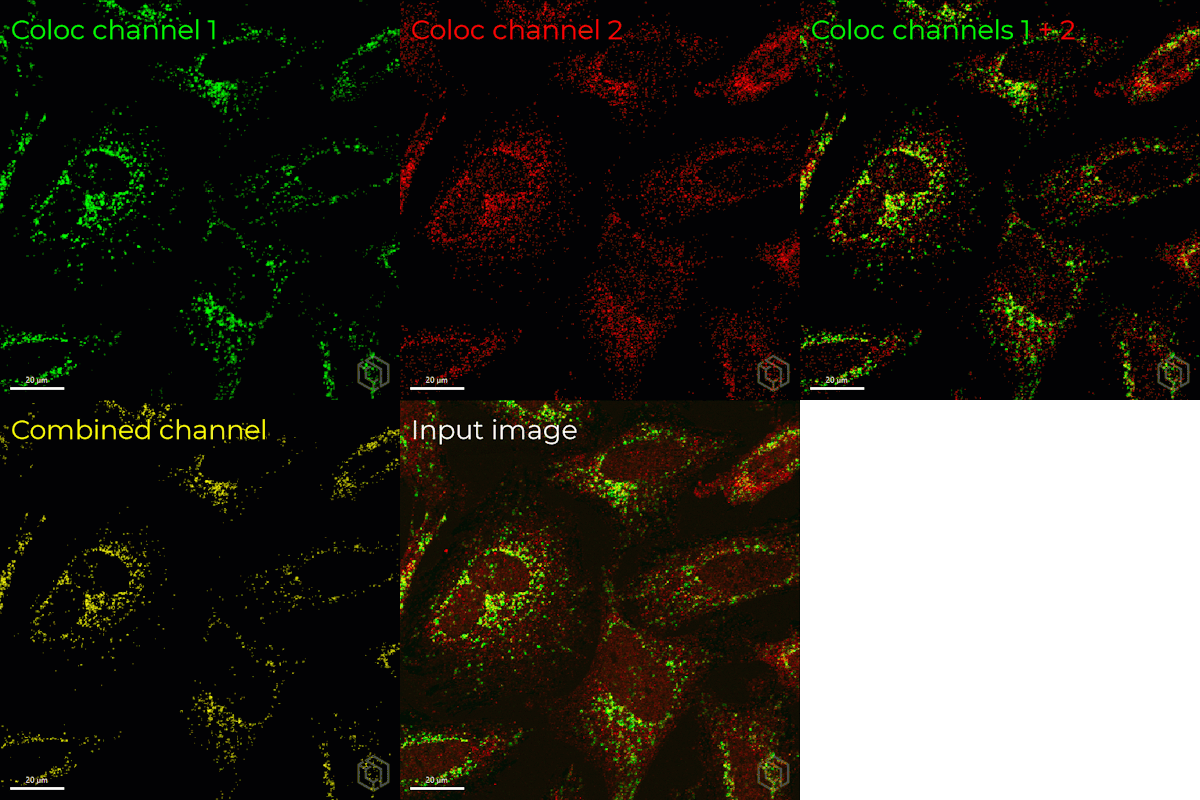
Two output channels are created by default, consisting of the output to Input Coloc Channels 1 and 2 respectively. You can add the Combined Coloc Channel output to the image by clicking on its checkbox in the Input and Output section.


Results

Image Modified

Animated GIF showing the three individual Pixel Colocalization outputs (Colocalized Pixels 1, Colocalizeds Pixel 2, Combined Coloc Channel), combined Colocalized Pixels 1 and 2, and the input image


Image Courtesy


Filter by label (Content by label)
showLabelsfalse
max5
spacescom.atlassian.confluence.content.render.xhtml.model.resource.identifiers.SpaceResourceIdentifier@836
showSpacefalse
sortmodified
reversetrue
typepage
cqllabel = "3d" and type = "page" and space = "AW"
labelsrecipes image_analysis analysis EM 3d


Page Properties
hiddentrue


Related issues