Aivia Software
VR interactions
Important safety message
DO NOT use Aivia VR if you have a previous medical history of seizure or epilepsy. Make sure you read and fully understand the health and safety warnings prior to using Aivia VR to reduce the risk of personal injury, discomfort or property damage.
Controller buttons
An example of a VR controller is shown on the right. For the purpose of this help file, we will be describing the interactions using the controls scheme of the controller that comes with the HTC Vive VR headset. Specific buttons and functions may vary depending on your VR controller.
There are five (5) buttons on each controller:
- The Menu button is the uppermost button on the face of the Vive controller; it is currently reserved for future functionality.
- The Trackpad is the large, touch-sensitive circle that occupies a majority of the controller's space.
- The Systems button is the lowermost button on the face of the Vive controller; it is used for opening up the Systems menu for SteamVR.
- The Trigger button is located on the backside of the Vive controller and serves as the primary input method for manipulating the environment in Aivia VR. It is also the method for button and slider selections while in the Steam Systems menu.
- The Grip buttons are located on the side of the Vive controller; each controller has two grip buttons on either side that must both be pressed together (by squeezing the controller) in order to activate its interactive features.
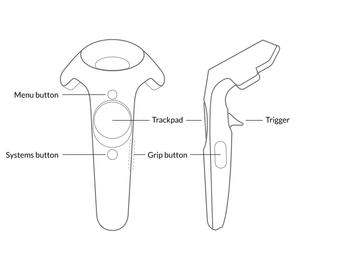 |
| HTC Vive controller diagram |
Interactions
The controller interactions are summarized in the table below.
| Interaction | Controller | Button | Instructions | Video walkthrough (click to play) |
|---|---|---|---|---|
| Flying | Left hand | Trackpad | Press up to bring the scene towards you Press down to move the scene away from you The speed of the flythrough will depend on the position you pressed on the trackpad (faster the closer to the edge is pressed) as well as the magnification of the scene | |
| Zooming | Both hands | Trigger | Pull and hold both triggers firmly, then pull the controllers away from each other to zoom in / magnify the scene Pull and hold both triggers firmly, then pull the controllers toward each other to zoom out / shrink the scene | |
| Grabbing | Either hand | Trigger | Pull the trigger and hold it firmly to grab the item in front of you, To rotate the object, rotate the controller about your wrist; release the trigger to place the object in the specified rotation To move the object, move the controller around; release the trigger to place the object in the specified location | |
| Panning | Both hands | Trigger | Pull and hold both triggers firmly, then move both controllers in parallel around the VR space; the controllers should stay roughly the same distance apart | |
| Clipping | Left hand | Grip | Squeeze the grip buttons on the left controller firmly to activate clipping plane / ortho slicer mode; move the controller about to adjust the position and orientation of the clipping plane / ortho slicer; release the grip buttons to clip the scene in the specified position and orientation Double-squeeze the grip buttons to toggle between clipping plane and ortho slicer modes | |
| Adjust display mode | Either hand | Systems | Press the Systems button to open the SteamVR Systems Menu. Point the controller cursor at the Aivia icon on the dock at the bottom of the Systems screen; pull the trigger button to open the Display Settings. Once in the Display Settings, you can toggle the visibility of individual channels and object sets | |
| Stepping through time | Right hand | Trackpad | Press or lightly tap the trackpad on the right to move forward one frame in time Press or lightly tap the trackpad on the left to move backward one frame in time Hold down on the trackpad firmly to move forward / backward multiple frames; release to stop the playback at the current time point | |
| Resetting | Right hand | Grip | Squeeze the grip buttons on the right controller once to reset the scene; this will return the display to its original position, rotation and magnification |