Aivia Software

How to view data in Virtual Reality (VR)

Important safety message

DO NOT use Aivia VR if you have a previous medical history of seizure or epilepsy. Make sure you read and fully understand the health and safety warnings prior to using Aivia VR to reduce the risk of personal injury, discomfort or property damage.


Virtual Reality (VR) is an immersive way to view 3D/4D data in Aivia. The VR mode allows you to view and manipulate 3D and 4D object and scene in a virtual reality environment. You can interact with the following items in VR:

  • 3D and 3D+time volumetric data
  • 3D surfaces
  • 3D tracks, including anchors and trends
  • 3D neuron objects, including soma, dendrites and spines

Display attributes can be changed in the Display Settings on the Desktop or in the Systems menu while in VR.

System requirements

The following are the minimum system requirements for using the VR mode in Aivia. Additional information can be found on the System Requirements page.

  • Virtual Reality-capable Nvidia graphics card
  • VR headset supporting the OpenVR standard, such as the HTC Vive or Oculus Rift
  • Aivia 6 or later
  • Steam and SteamVR (requires registration)


On this page:

Controls

For the purpose of this how-to, we will be using the HTC Vive controller as the standard controller for interaction. Mappings of individual buttons and their functions may be different on other controllers.

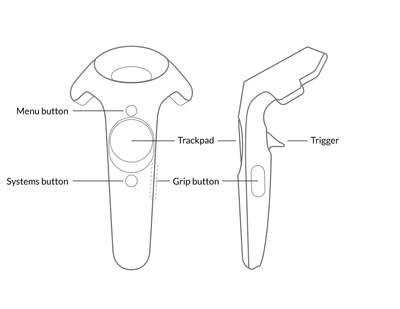
A diagram of the HTC Vive controller is shown on the right. There are five buttons on each controller (one for each hand):

  • The Menu button is the uppermost button on the face of the Vive controller; it is currently reserved for future functionality.
  • The Trackpad is the large, touch-sensitive circle that occupies a majority of the controller's space.
  • The Systems button is the lowermost button on the face of the Vive controller; it is used for opening up the Systems menu for SteamVR.
  • The Trigger button is located on the backside of the Vive controller and serves as the primary input method for manipulating the environment in Aivia VR. It is also the method for button and slider selections while in the Steam Systems menu.
  • The Grip buttons are located on the side of the Vive controller; each controller has two grip buttons on either side that must both be pressed together (by squeezing the controller) in order to activate its interactive features.


If you are not sure which controller is the left or the right, press the Systems button to launch the SteamVR Systems menu and look at the base of the controller. The handedness of the controllers are indicated by a hand icon for each controller.

HTC Vive controller diagram


Interactions

There are nine (9) modes of interactions that are available in Aivia VR, they are:

  • Viewing or looking at the displayed volume or surfaces in the VR environment ('scene')
  • Flying or moving about the scene freely
  • Zooming in or out of the scene to make it bigger or smaller respectively
  • Grabbing a volume or object group to move it to a different location in the scene or rotate
  • Panning or pushing / pulling the scene
  • Clipping a portion of the scene from the display
  • Adjusting the visibility and rendering modes of the displayed volume and objects
  • Stepping through time on a 3D+time dataset
  • Resetting the scene to its original view


The modes of interactions, their button-bindings and instructions to activate the function are summarized in the table below.

InteractionControllerButtonInstructions
ViewingNot requiredNot requiredMove your head around to explore the VR space around you. If your VR is set up for room-scale play, you can also walk around the VR space to view the scene
FlyingLeft handTrackpad

Press up to bring the scene towards you

Press down to move the scene away from you

The speed of the flythrough will depend on the position you pressed on the trackpad (faster the closer to the edge is pressed) as well as the magnification of the scene

ZoomingBoth handsTrigger

Pull and hold both triggers firmly, then pull the controllers away from each other to zoom in / magnify the scene

Pull and hold both triggers firmly, then pull the controllers toward each other to zoom out / shrink the scene

GrabbingEither handTrigger

Pull the trigger and hold it firmly to grab the item in front of you,

To rotate the object, rotate the controller about your wrist; release the trigger to place the object in the specified rotation

To move the object, move the controller around; release the trigger to place the object in the specified location

PanningBoth handsTriggerPull and hold both triggers firmly, then move both controllers in parallel around the VR space; the controllers should stay roughly the same distance apart
ClippingLeft handGrip

Squeeze the grip buttons on the left controller firmly to activate clipping plane / ortho slicer mode; move the controller about to adjust the position and orientation of the clipping plane / ortho slicer; release the grip buttons to clip the scene in the specified position and orientation

Double-squeeze the grip buttons to toggle between clipping plane and ortho slicer modes

Adjust display modeEither handSystemsPress the Systems button to open the SteamVR Systems Menu. Point the controller cursor at the Aivia icon on the dock at the bottom of the Systems screen; pull the trigger button to open the Display Settings. Once in the Display Settings, you can toggle the visibility of individual channels and object sets
Stepping through timeRight handTrackpad

Press or lightly tap the trackpad on the right to move forward one frame in time

Press or lightly tap the trackpad on the left to move backward one frame in time

Hold down on the trackpad firmly to move forward / backward multiple frames; release to stop the playback at the current time point

ResettingRight handGripSqueeze the grip buttons on the right controller once to reset the scene; this will return the display to its original position, rotation and magnification