Apply classifier
Aivia comes pre-loaded with three classifiers for neuron classification. You can also load a classifier from file and apply classification on new data by pressing the load classifier  icon on the Classifier view toolar.
To apply a classifier, select the classifier to run from the dropdown menu and click the Apply button in the lower right corner of the gallery. If the data has existing classifications, applying a classifier will remove the existing classifications and create new ones.
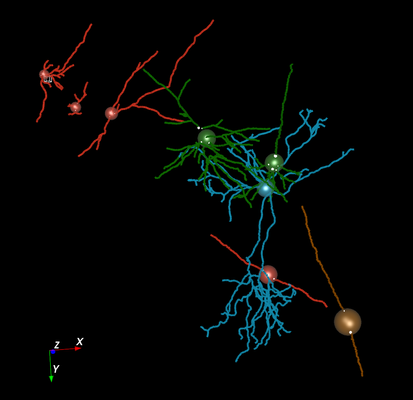
On apply, the classifier will look at each object and assign a class. If you have Color by Class turned on in the Display Settings, the color of the objects will change to correspond to its assigned category. An example of classified output is shown on the right.
You can also view the objects by class in the Spreadsheet panel as subsets.
|
| Example of classification output with Color by Class turned on (Neuron reconstruction courtesy of NeuroMorpho.org) |
Create classifier
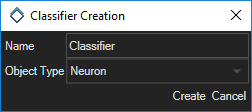
You can create a new classifier from scratch by clicking on the Create New Classifier  button in the Classifier View. Make sure you have loaded an image and have analysis data prior to using the Classifier tool. When you click the Create New button, the Classifier Creation dialog will be shown (see right).
Select object type
In the dialog, enter a name for your classifier into the Name field and select the type of objects you wish to classify using the Object Type dropdown menu. Aivia currently supports the classification of seven types of objects:
| Object Type | Description |
|---|---|
| Neuron | Classify whole 3D neuron (based on full neuron reconstruction with soma, dendrites, and spines included) |
| MeshFeatures | Classify 3D object surfaces |
| Soma | Classify 3D soma |
| Dendrite | Classify 3D dendritic arbors (based on overall dendrite branching) |
| DendriteSemgent | Classify 3D dendritc branches/segments as individual objects |
| Spine | Classify 3D spine objects (based on spine head and neck) |
| Outline | Classify 2D objects for each time-point |
Create class
In order to create a functional object classifier, you will need to have a minimum of two (2) classes defined with examples of objects given in each class. To create a class, click on the + button to the right of the Class dropdown menu in the classifier bar.
When you create a class, a new header is shown in the gallery with the name highlighted. Type in a new name and press Enter to finish creating a class. Do this for each class you wish to add to the classifier.
Select measurements
Starting in Aivia 7.5, you can specify which measurements to use when generating the classification rules by clicking on the Select measurement  icon on the toolbar.
When you click on the icon, a new dialog opens. Click on the checkbox for each measurement you want to include. If the measurement has not been calculated on the image, it will be automatically calculated when you apply the classifier. When you are finished selecting the measurements, click Finish to confirm and save your changes.
Intensity measurements can be selected on the additional tabs in the Select Measurement window. Once you have selected the intensity measurements, click on the Channel Input Selection button located just below the toolbar to specify the input channels to measure from the image.
 |
| Channel input selection (expanded) |
|
| Select measurement window |

Teaching the classifier
The classifier is generated through a "teaching" process by providing examples of objects for each defined class. The Classifier tool uses a random forest algorithm to identify unique (and most recurrent) measurements for separating the classes.
Depending on the Object Type chosen, the Classifier tool will automatically generate the appropriate list of measurements to be used for classification. Depending on the size of the image, there may be a short delay in Aivia while the measurements are being generated.
To teach the classifier, first select the representative objects by clicking on its thumbnail in the gallery or directly on the image. You can select multiple objects by holding down the Ctrl or Shift key on your keyboard while clicking in the gallery or on the image. Alternately, you can also use the Toggle Multi-Selection  option to select multiple objects one-by-one.
There are two ways to assign an object to a class for teaching:
- Drag-and-drop the selected thumbnails directly to the header of one of the classes in the gallery
- Select the class to assign to using the Class dropdown menu below the gallery and clicking the Assign button.
Once selected, you can drag-and-drop the selected thumbnails directly to the header of one of the classes in the gallery. Alternately, you can select the class to assign to using the Class dropdown menu below the gallery and clicking the Assign button.
On assignment to a class, the selected thumbnails will appear in the gallery of its assigned class.
When you are done providing the examples for the classifier, press the Teach button to generate the classifier.
You need to provide at least one (1) example object for every class you have created in the Classifier View. Additionally, a minimum of two (2) classes are required
Review classifier quality
You can review the quality of the classifier by looking at the quality indicator to the left of the Teach button. A full green bar indicates the classifier is good (meaning that the classifier has sufficient unique features to separate each class) whereas a red bar indicates the classifier is poor. You can view the classifier accuracy value by hovering over the bar.
You can review the classification quality for each class by looking at the indicator bar to the left of the class header in the gallery.
Save classifier
After applying the classifier, make sure to save the classifier by clicking the Save Classifier button  . This will allow you to load the classify and apply it to other images in the future.
Additional options
The Detect Novelties checkbox allows you to incorporate novelty detection to your classifier. With novelty detection turned on, the classifier will generate an additional novelty score for each object. If the object's novelty score is higher than the specified Novelty Threshold, it will be assigned to a novel class in addition to an existing class.
This option lets you identify outliers in your data that may potentially belong to an unknown phenotype.