Aivia Software
Creating Python Recipes
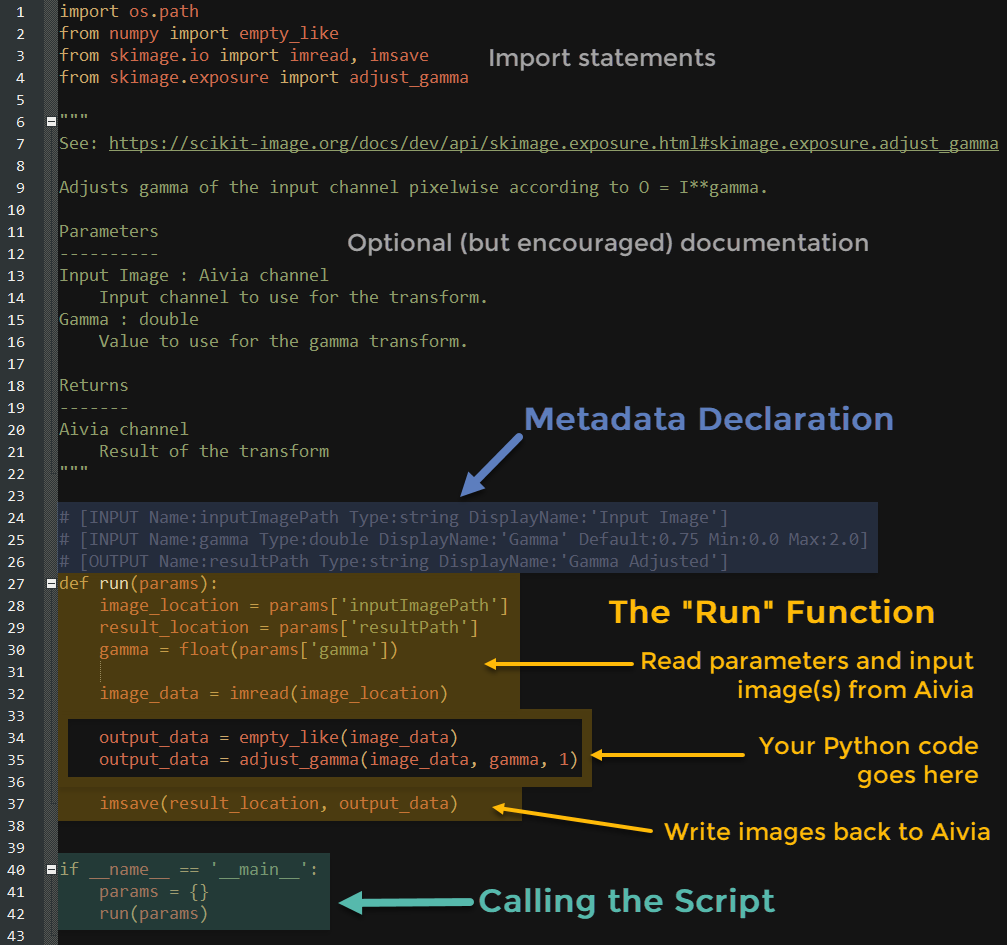
Anatomy of a Python Aivia Recipe
Aivia expects your Python recipe to have a few critical components that follow a set of formatting guidelines as explained here. You can think of the components of a Python recipe like this:
- Aivia reads a "metadata declaration" section of your recipe to understand how to set up recipe parameters.
- When the script is called, Python reads the parameters input to the Recipe Console UI into a "params" dictionary.
- This params dictionary is passed to a "run" function that executes the bulk of the Python code.
Metadata Declaration
Aivia requires that you specify both the "image in" and "image out" points of your script before it will successfully set up the recipe in the Recipe Console. Other inputs are optional but will allow you to pass information from Aivia into the Python namespace. Each line in this declaration section defines one variable to be passed.
Each line of this section requires a pound character followed by space then an opening bracket. Inside the brackets, we first declare whether the variable is an INPUT to Python or an OUTPUT from Python in all caps. We declare the properties below before completing the line with a closing bracket:
- Name - this is the key for the variable that is inserted into the params dictionary
- Type - this is the expected type of the variable
- string - arrays are passed to/from Python using paths to temporary files, declared here as strings
- int - 32bit integer value to use as input
- double - 64bit float value to use as input
- DisplayName - this is the name for the variable that Aivia will display in the UI for the user's input
Note: Although Python is dynamically typed, Aivia requires this type declaration to know how to set up the UI.
If the declared type is int or double, Aivia also expects three extra properties:
- Default - the default value for the variable
- Min - the minimum allowed value for the variable
- Max - the maximum allowed value for the variable
For double type, values must have one decimal at least. A good example of this metadata declaration section can be found in our AdjustGamma.py recipe:
# [INPUT Name:inputImagePath Type:string DisplayName:'Input Image']
# [INPUT Name:gamma Type:double DisplayName:'Gamma' Default:0.75 Min:0.0 Max:2.0]
# [OUTPUT Name:resultPath Type:string DisplayName:'Gamma Adjusted']
The first line declares that Python should look for an INPUT in the params dictionary with a key of "inputImagePath". This is a string type since it will automatically define the file path where the channel is temporarily saved on disk. Aivia knows to display this parameter automatically as a dropdown box for the user to select the channel to pass to Python. More than one of these can be used, but in this case we only need the one channel.
The second line declares an optional INPUT variable with a type of double that will be passed to Python in the params dictionary with a key of "gamma". Aivia will automatically display this as a spin box labeled "Gamma" that accepts decimal input. The default value is 0.75, but values between 0.0 and 2.0 are accepted.
The third line declares that Python is expected to place its OUTPUT array to a different file path on disk, passed back to Aivia as the "resultPath" key in the params dictionary. When the recipe is finished, Aivia will automatically load the image from this path as a new channel.
When this recipe is loaded into Aivia, we see the Recipe Console set up as follows:

See our MaxSlices.py recipe for an example of how to pass an int type to Python:
# [INPUT Name:inputImagePath Type:string DisplayName:'Input Image']
# [INPUT Name:width Type:int DisplayName:'Width' Default:3 Min:2 Max:1000]
# [OUTPUT Name:resultPath Type:string DisplayName:'MaximumZ']
Multiple channels can also be passed to and from Python, as shown in our ImageComparisonMetrics.py recipe:
# [INPUT Name:inputRTImagePath Type:string DisplayName:'Input Restored Image']
# [INPUT Name:inputGTImagePath Type:string DisplayName:'Input Ground Truth Image']
# [OUTPUT Name:resultPath Type:string DisplayName:'SSIM image']
# [OUTPUT Name:resultPathAdj Type:string DisplayName:'GT Hist match image']
You can also pass some extra properties to an OUTPUT declaration that will tell Aivia to automatically create meshes from the image that is passed back to it from Python:
- Objects - either "3D" or "2D: to indicate what Aivia should expect, and therefore which mesh creation algorithm to use
- MinSize - the minimum size of the objects allowed (in area if 2D, otherwise in volume)
- MaxSize - the maximum size of the objects allowed (in area if 2D, otherwise in volume)
For example, the metadata declaration section of our SkeletonizeObjects.py recipe instructs Aivia to take the binary image we write back to path defined by the the "resultObjectPath" key in params and create 3D objects from it:
# [INPUT Name:inputImagePath Type:string DisplayName:'Input Image']
# [INPUT Name:threshold Type:int DisplayName:'Threshold' Default:128 Min:0 Max:65535]
# [INPUT Name:radius Type:int DisplayName:'Closing Radius' Default:0 Min:0 Max:100]
# [OUTPUT Name:resultImagePath Type:string DisplayName:'Skeleton Image']
# [OUTPUT Name:resultObjectPath Type:string DisplayName:'Skeleton Objects' Objects:3D MinSize:0.0 MaxSize:1000000000.0]
Two additional variables are included in the params dictionary as a convenience from Aivia without the explicit need for you to declare them:
- TCount - the number of time frames in the input channel
- ZCount - the number of Z frames in the input channel
These are useful when you are making a recipe that needs to adjust how it handles the processing of data based on what physical dimensions mean. Our ShapeIndex.py recipe is an example of this.
The "Run" Function
The run function in your recipe script is required and should immediately follow the metadata declaration section, with no line breaks preceding it.
The screenshot of the AdjustGamma.py recipe in the sidebar shows the simplest example of this function. Inside the run function, you see that we first unpack the params dictionary into more "Pythonic" variables. This isn't required, but makes the rest of the code more readable. This is also a convenient place to force Python to read data with a certain type if necessary.
After unpacking the dictionary, you typically need to read the channels from Aivia into Numpy arrays. From there, you can perform whatever processing you like, write intermediate output to disk in non-image formats, and even call additional functions or classes.
At the end of the run function you will need to write a resulting array back to disk as specified by the OUTPUT file path in the metadata you declare so that Aivia knows where to find the image to automatically load. Note that Aivia expects an array with the same shape as the original. You should also be careful to cast arrays to different types correctly to avoid clipping values.
Calling the Script
The final portion of the script defines the entry point. At a minimum, you must create a params dictionary and call the run function by passing it the params dictionary. When the "Start" button is pressed in the Aivia console, Aivia calls Python to execute this script as the main program, executing the code within.
Extra Information
By default, Aivia installs Python 3.9 and explicitly installs the following external modules:
- scikit-image
- NumPy
- aiviadeeplearning
You can install whatever packages you like to this Python interpreter and utilize them in your recipes. Note also that scikit-image and NumPy have their own dependencies, such as SciPy and Matplotlib, that will be installed by consequence.
Your Python recipe's names must not include spaces and must have the .py extension for Aivia to recognize them. Your python recipe's names need to also not conflict with any other modules in Python’s PATH variable. You may end up conflicting with another file and Aivia will not be able to find your functions. Uniquely name your recipes so this conflict doesn’t occur.
Further Information
See our GitHub repository for examples of applications that have already been made using Python within Aivia.