Aivia Software
Volume Transformer
The Volume Transformer allows you to create a new version of an image that is rotated in 3D about any axis (X, Y, Z, or other) and has blank space trimmed from its edges, if that is opted for. You may adjust the angle of an ortho plane and/or choose a "bottom" plane to define the rotation angle.
Interface
The Volume Transformer is one of eight tools found in the 3D Tools tab in the (Pre-version 12) Analysis Panel. Go to 3D View or 3D Plane View to show the 3D Tools tab. Click on the 3D Tools tab, and then click on the Volume Transformer icon ![]() to launch the tool. When the Volume Transformer is first launched, the GUI below appears.
to launch the tool. When the Volume Transformer is first launched, the GUI below appears.
|
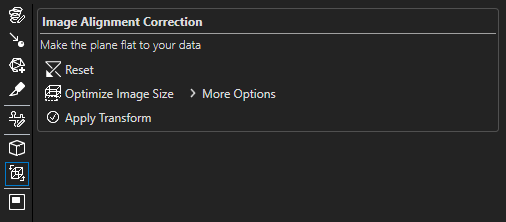
Volume Transformer GUI |
Each time the Volume Transformer is launched, an ortho plane is shown. Any existing clipping planes are hidden, and an ortho plane is created if one did not exist prior to the launch of the tool.
Tool options
Basic options
| Option | Icon | Description |
|---|---|---|
| Reset |  | Resets the transformation to its default state (no transformation) |
| Optimize Image Size |  | If selected, blank space will be trimmed from the sides of the transformed image, which can cause the transformation to be slower |
| Apply Transform |  | Applies the transformation, generating a new image that is added to the Image Explorer and displayed in the Image Viewer once it has been created |
More options
You can access these options by clicking on the expand icon ![]() next to More Options.
next to More Options.
| Option | Icon | Description |
|---|---|---|
| Extra Alignment Points |
| Adds three points that anchor the ortho plane and can be moved to any spatial locations to help with fine adjustment of the rotation angle |
| Show Intersecting Plane |  | Clips away the portions of the image that do not intersect with the ortho plane |
| Preview |  | Shows a preview of the transformation |
| Channels to Process |  | Allows you to select/deselect image channels to transform |

Advanced option
You can access this option by clicking on the expand icon ![]() next to More Options and then on the expand icon
next to More Options and then on the expand icon ![]() next to Advanced.
next to Advanced.
| Option | Icon | Description |
|---|---|---|
| Choose Bottom Plane |
| Allows you to select a plane that, relative to the transformation preview, will be transformed to an XY plane |

On this page:
Using the Volume Transformer
To launch the Volume Transformer, click on the 3D Tools tab in the Analysis Panel in Aivia and select the Volume Transformer ![]() from the 3D Tools toolbar. This will open the Volume Transformer interface and create or show an existing ortho plane while hiding any existing clipping planes.
from the 3D Tools toolbar. This will open the Volume Transformer interface and create or show an existing ortho plane while hiding any existing clipping planes.
Align the plane with the image
Select and drag the unidirectional red, green, and blue arrows or one of the shaded squares between two arrows to adjust the position of the alignment point; this can help ease the alignment process but will not affect the volume transformation. Select and drag the curved, double-sided red, green, and blue arrows to adjust the angle of the ortho plane; this will affect how the image is transformed. Align the plane so that it appears "flat" to the image.
Reset the ortho plane
Click on Reset to revert the ortho plane to its initial state, which corresponds to no rotation of the image.
Use extra alignment points
Add three more alignment points to help with aligning the ortho plane to the image by selecting Extra Alignment Points in the expanded More Options section. These three yellow points anchor the ortho plane and may be translated along the x-, y-, or z-axes. To translate any of the alignment points, hover over the alignment point and then click and drag one of the arrows extending outward from the point or one of the squares between two such arrows. While any of the three extra alignment points is being moved, the other two remain in the same spatial location, helping to define the ortho plane. However, if the original alignment point, which appears as a white cube, is selected and used to manipulate the ortho plane, the extra alignment points are not guaranteed to stay in the same spatial locations.
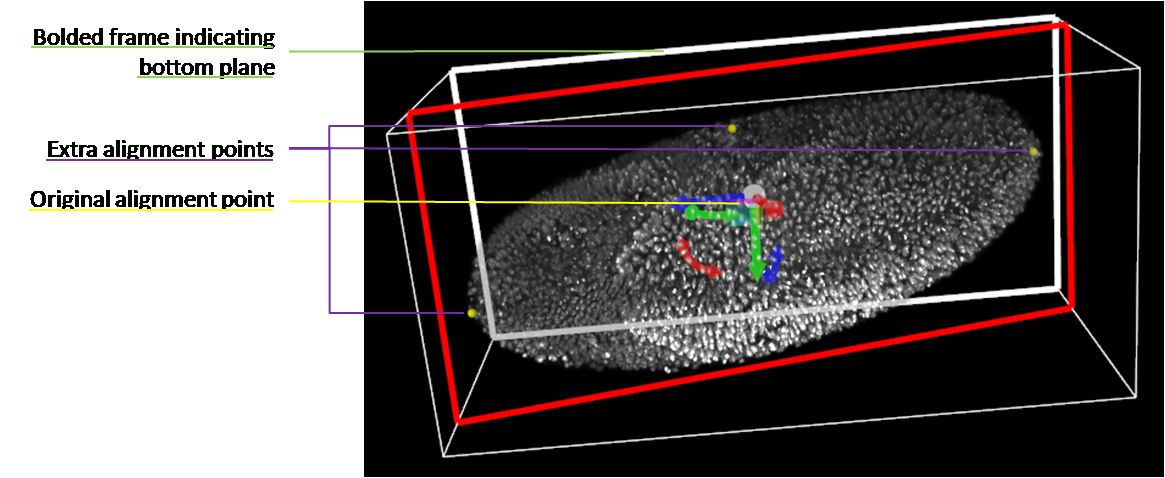 |
| Image display during alignment with extra alignment points |
Show the intersecting plane
Select Show Intersecting Plane in the expanded More Options section to clip away parts of the image and show only the section made but cutting the image with the ortho plane.
Optimize image size
Select Optimize Image Size before applying a transformation to trim blank space from the sides of the rotated image. Note that optimizing the image size can make the transformation take longer.
Show a preview
You may turn on a preview by clicking the expand icon ![]() next to More Options and then selecting Preview to get an idea of how the image will be rotated. While a preview is shown, the original image is hidden.
next to More Options and then selecting Preview to get an idea of how the image will be rotated. While a preview is shown, the original image is hidden.
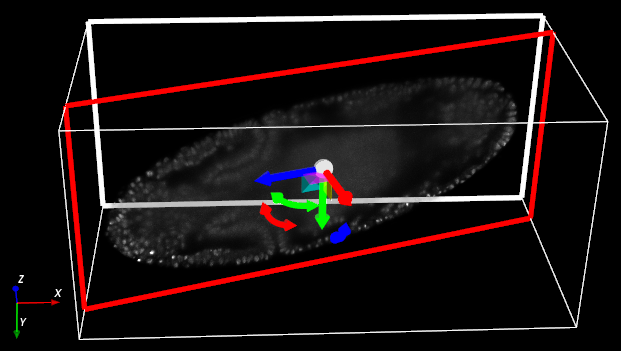 |
| Intersecting plane shown |
Select image channels to transform
By default, the image channels that are visible are transformed, and those that are hidden are neither transformed nor included in the transformed image. Click on the expand icon ![]() next to More Options and then on Channels to Process to open a menu where image channels can be selected or deselected for transformation.
next to More Options and then on Channels to Process to open a menu where image channels can be selected or deselected for transformation.
Choose a new bottom plane
To change what the bottom plane (XY plane that appears furthest away when an image is first put in 3D View) will be in the transformed image, click on the expand icon ![]() next to More Options, then on the expand icon
next to More Options, then on the expand icon ![]() next to Advanced, and finally on the Bottom drop-down menu. By default, the bottom plane is set to Auto, which means the bottom plane is chosen in order to minimize the length of the z-dimension in the transformed image. The bottom plane that will be used in the transformation has a bold white frame around it. You may designate any of the six surfaces of the image cube as the bottom plane.
next to Advanced, and finally on the Bottom drop-down menu. By default, the bottom plane is set to Auto, which means the bottom plane is chosen in order to minimize the length of the z-dimension in the transformed image. The bottom plane that will be used in the transformation has a bold white frame around it. You may designate any of the six surfaces of the image cube as the bottom plane.
Apply transform
Click Apply Transform to transform the image. The transformed image will be displayed in the Image Viewer once it has been created, and its thumbnail will appear in addition to that of the original image in the Image Explorer. The transformed image is NOT automatically saved.
Image credits
Philipp Keller, Howard Hughes Medical Institute, Janelia Farms Research Campus, Ashburn VA; Cell Tracking Challenge, http://www.celltrackingchallenge.net/datasets.html
Related articles
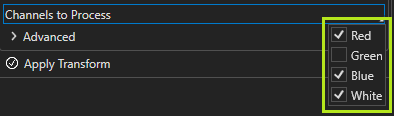 |
| Channel selection menu |